Now the Germans are looking to press the counterattack and maintain their momentum. To have any hope of success the British must stop them here and resume their own attack.
If there is any consolation it is that the Germans should find this position a difficult one to take.
That said, the British platoon is not in the best shape. They have a number of permanent casualties and although two wounded men return in time for this action they remain short of seven men. As a result the platoon has been reorganised so that there are two sections at full strength (or close to it) and one that is no more than a Bren team under the command of a section corporal.
However, I'm not overly concerned. The British have twenty one supports points for this game and that should make up for the shortage of men in the core platoon. That support will be made up of a forward observer directing a 3" mortar barrage; a Vickers MMG team; an extra section of infantry; a 17 pounder anti-tank gun; an Adjutant, and, a medical orderly.
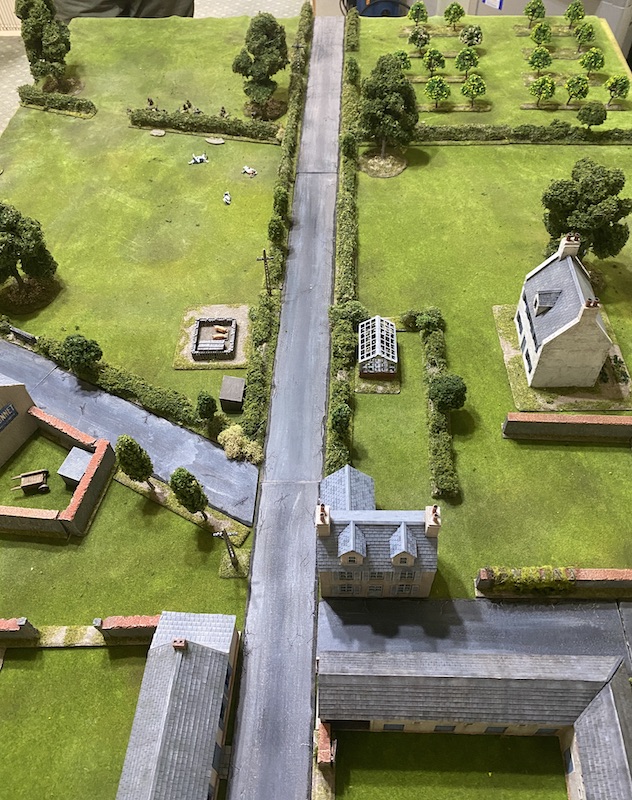
The patrol phase starts with four free moves for the Germans. That's not quite enough to see them establish a jump-off-point in the village or to deny the British an opportunity to form a defensive position on the outskirts.
The British begin with their force morale at only eight while the Germans are at eleven. Not an encouraging start. The Germans also have the opening phase and a squad deploys from the central jump-off-point and takes up overwatch positions behind the hedgerow.
A second squad joins them and takes up tactical positions.
That puts a lot of firepower behind that hedgerow, but I'm hoping I can make the position untenable with the mortar barrage.
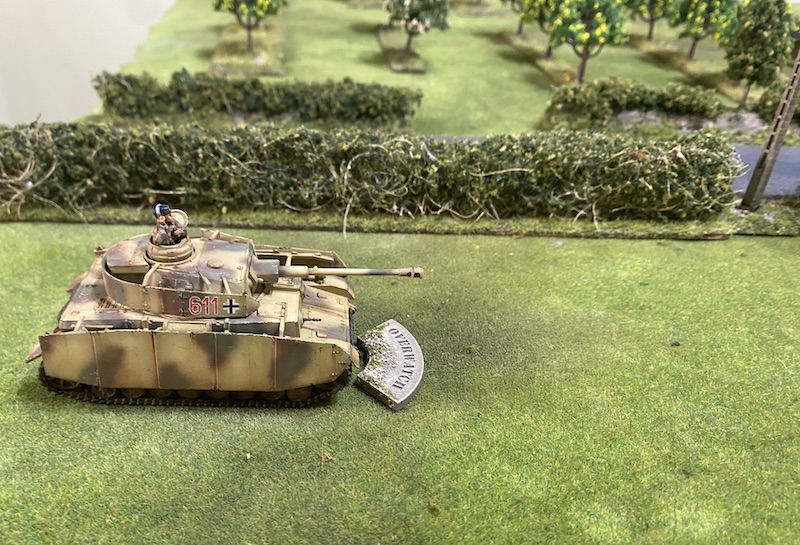
A PzIV arrives behind the squads and the commander puts the gunner on overwatch.
Next a small panzer grenadier rifle team under the command of a junior leader deploys from the jump-off-point on the right flank and they take up tactical positions.
I think that makes it quite clear where the initial German effort is going to be placed.
In the British phase I see no reason to hold back the barrage. The forward observer deploys into the upper level of a house near the cross road.
That gives a good line of sight across the table and particularly to the squads lining the hedgerow. He makes radio contact with the battery to request the barrage.
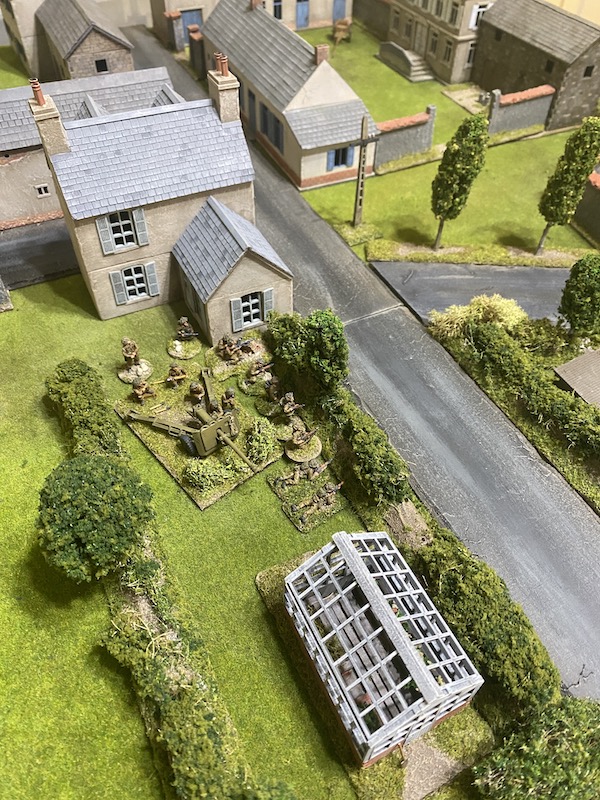
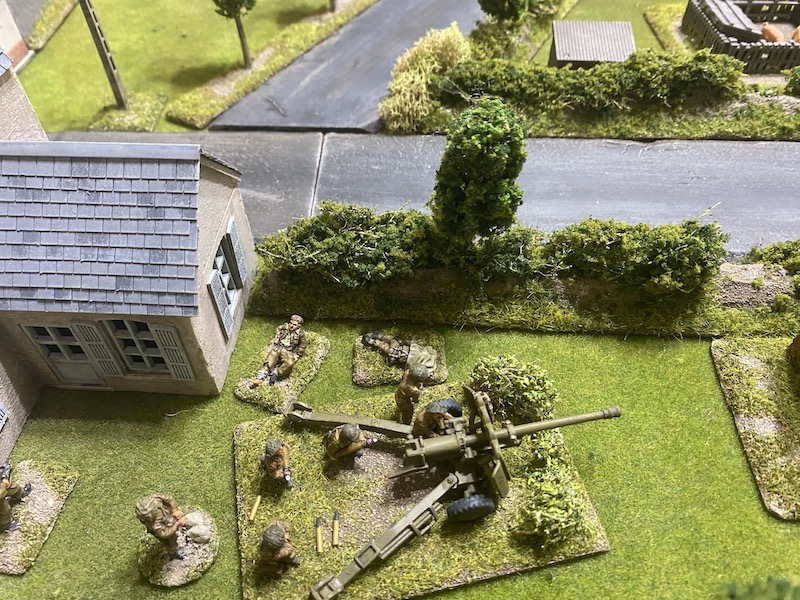
There seems no reason to hold back the 17 pounder either. With the PzIV in its sights it reveals itself in the garden near the forward observer.
From there the gun crew can see the turret of the German tank over the hedgerows. It makes for a partially concealed target but the gun commander helps the crew lay the gun.
The armour piercing round slams into the turret inflicting eight AP strikes. The relatively weak armour of the PzIV offers little resistance and the tank is knocked out.
The crew are spared when the tank fails to explode and they make a hasty exit. Nonetheless the loss of the tank is a blow to German morale which drops to ten.
That's a bright start for the British. Most importantly it means a section can deploy into the ground level of one of the farmhouses on that flank without being targeted over the hedgerows.
They take up overwatch positions in anticipation of any German attempt to cross the hedgerow lining the road.
However, the British have no grounds for complacency - the next German command roll is 66321, giving them the opportunity to exploit a double phase and press forward. The platoon’s attached PzIV arrives in the orchard and the gunner is placed on overwatch.
The tank stays well back in the trees careful to avoid the line of sight of the 17 pounder. This is a tank the Germans will be very reluctant to lose. I expect Dave to employ it very cautiously. Nonetheless it does have a line of the sight to the farmhouse and so represents a very real threat to the section there.
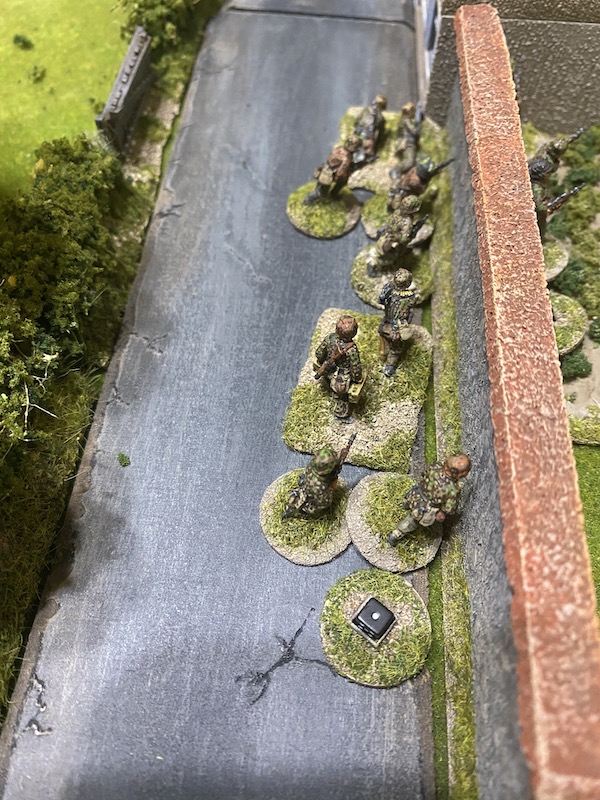
The panzer grenadier team on the other hand throw caution to the wind and move quickly. They clamber over the hedge and into the road.
The British section in the farmhouse may be on overwatch, but the arc of fire out of the windows means those Germans are approaching from a blind spot.
However the threat of a mortar barrage is enough to see the Germans disband the fire line at the hedgerow and spread out. One of the squads moves at the double towards the jump-off-point on their right flank.
The following German command roll is 65444. It's not the most useful but it does allow them to maintain some of their momentum. A support oberscharführer (senior leader) deploys from the right flank jump-off-point.
From there he orders the panzer grenadier team to move toward the house.
This they do, lining the road near the windows but out of sight of the occupying British section.
He then rallies a point of shock from the full squad and has them move at the double up to the hedgerow.
In the British phase a section deploys near the 17 pounder.
The line of sight is limited, but the Bren team can see along the road to target the panzer grenadier team outside the farmhouse.
Despite being caught in the open the Germans escape the blast of Bren fire unscathed.
It's at this stage I realise I've made a bad mistake. The British command roll was 65442 and I was intending to deploy the platoon sergeant into the farmhouse to extricate the section. However I've forgotten to take into account that the panzer grenadier team are now within 4" of the jump-off-point in the farmhouse and have closed it down.
I should have used the 2 in the command roll to extricate the section, but that moment has passed. It may prove costly. In the German phase the oberscharführer moves up to the hedgerow to join the squad.
That puts him in command range of the panzer grenadier team at the farmhouse.
He has them post two grenades through the farmhouse windows.
They both explode with deadly effect. The British lose four men, two from each team and they suffer a point of shock. That's a terrible result and I feel as though I have only myself to blame.
The Germans are not done yet and they return fire along the road at the Bren gun team. That proves deadly as well and the team lose two men.
In one short but murderous phase the relatively small panzer grenadier team has inflicted six British casualties.
The scharfuhrer (junior leader) at the hedge rallies a point of shock and sends his squad into the road. The rapid German advance has taken the British by surprise and with the jump-off-point closed down there is little they can do to react.
The following British command roll is 65441 which may leave the section in the farmhouse immobile but allows the forward observer to call in an aiming round.
He calls one down on the squad at the central German jump-off-point but it fails to fall on target.
The platoon sergeant then deploys near the 17 pounder.
The section at the hedgerow is in danger of losing its Bren team and so he orders them to withdraw out of the line of fire.
He then puts the 17 pounder crew on overwatch.
In the German phase the oberscharführer continues to drive the German flank attack forward.
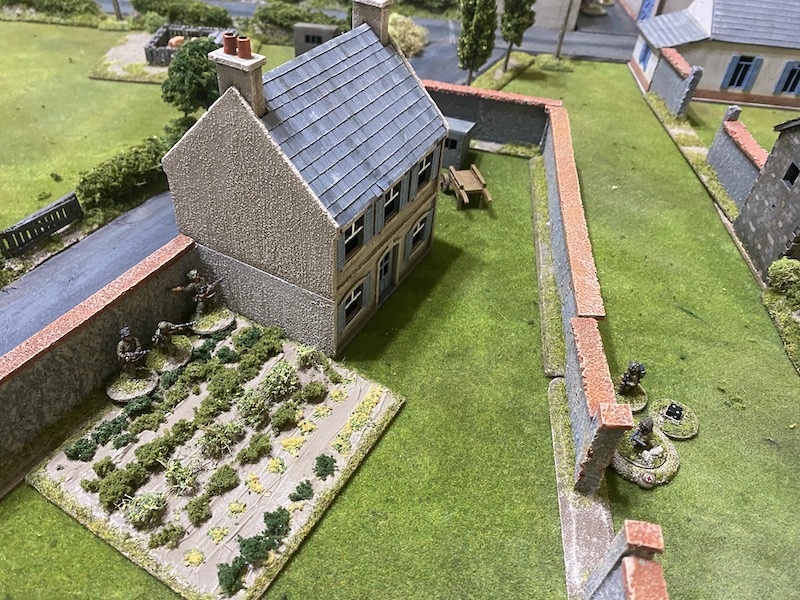
The panzer grenadier team have expended their grenades and so he sends them over the high wall into the farmyard.
That puts the section in the farmhouse in real danger of being surrounded.
The oberscharführer rallies more shock from the squad.
Then he then sends them across the road and to the corner of the farmhouse. I think it's clear what's about to happen next....
The squad's scharfuhrer rallies off a point of shock and then has one of the men throw another grenade in through the window.
It explodes with lethal force and wipes out the remaining man in the Bren team. That takes British force morale down to seven. This has become very ugly.
The squad back at the central jump-off-point take up tactical positions. I think it's in anticipation of the barrage, but it will offer them little protection from that.
Right on cue the forward observer adjusts the barrage but also calls it down at the same time. There's a chance it misses the target but I'm prepared to run the risk as it's highly unlikely to come near my own men.
The barrage is not on target but falls close enough to smother the squad at the hedgerow.
It does little damage other than inflict a point of shock on one of the LMG teams, but for now at least it takes that squad out of action and puts them in harm's way.
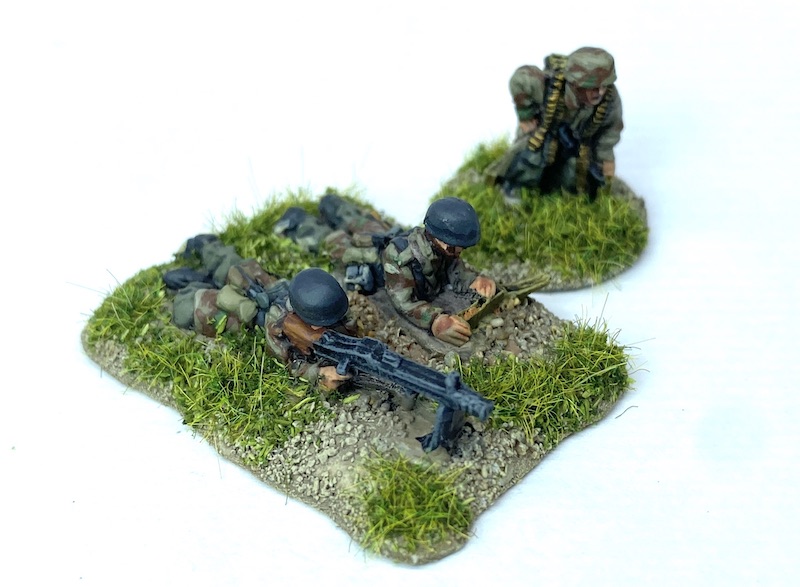
The support section deploys near the platoon sergeant and they line the hedgerow. Once again only the Bren team has a line of sight down the road but the section corporal uses Concentrated Fire to have the team focus on one of the German LMG teams. Despite having no cover the Germans suffer only two points of shock.
The sergeant then orders the other section to move tactically into the road behind the house.
Back at the farmhouse the section corporal finally manages to gather his wits about him and make a decision. First, he rallies the shock off the rifle team.
He realises there is no point remaining where he is and orders the men out of the house.
They charge out through the back door and take on the Germans in the vegetable garden.
A bloody hand-to-hand fight ensues. The Germans get the upper hand but it's a pyrrhic victory. The British kill three of them including the team's junior leader and they suffer a point of shock.
The British in turn suffer four casualties, one of whom is the section corporal who is lightly wounded. Having lost the combat and with two points of shock the remaining two men fall back out of the farmyard.
That was vicious. German morale drops to eight and British moral to six. Nonetheless the British section was able to extract some revenge for the losses they suffered.
In the German phase the scharfuhrer of the squad in the road spends the phase rallying shock off the men.
The nearby oberscharführer rallies the remaining shock and has the squad move back across the road towards him.
I wasn't sure what Dave was planning here until I realised the squad were now within 12" of their jump-off-point. He must be contemplating withdrawing before the barrage and the remaining British can inflict any further casualties. He's done enough to delay the British for a campaign turn and having inflicted a number of casualties he probably thinks it's better to leave now and be in good shape to fight the next game.
All that said, the Germans are not quite finished yet. What remains of the panzer grenadier team are determined to revenge their fallen squad leader.
They set off to attack what remains of the British section.
They move quickly across the farmyard and out of the gate.
Another short and violent combat takes place. This time the British gain the upper hand, but there is not much in it and it leaves both teams shattered. The Germans kill the remaining British rifleman and the lone wounded leader falls back due to the shock.
The Germans lose two men and the sole surviving member of the team suffers two points of shock, enough to break him and he too falls back.
Despite having the rifle team wiped out British morale holds steady. On the other hand the breaking of a support team is enough to see German morale drop to six.
The British then receive a moment of good fortune with a command roll of 66311. Can I exploit this opportunity fully and extract some revenge on the Germans? Once again the forward observer calls down the barrage.
Despite hitting both teams in open ground the Germans suffer only a singe point of shock.
I'm hoping the Vickers can carry out more devastating work. It deploys at the crossroads.
From there it can sweep the road with fire.
The lone survivor of the panzer grenadier team is killed and that sees the team wiped out.
Two of the panzer grenadiers in the squad are also hit, as is the scharfuhrer, who suffers a light wound. That and the loss of a support team is enough to take German force morale down to four.
The section that has been reduced to a corporal and a Bren team then deploy alongside the Vickers team.
They also fire but this time the Germans manage to escape unscathed.
In the following phase the platoon sergeant orders the Bren and Vickers to maintain their fire.
The German squad receives eight hits but they escape very lightly, suffering only three points of shock. That was disappointing from a British perspective. I would have hoped to have inflicted a lot more damage with a shot like that (on average dice you would expect to see 2-3 kills and an equivalent amount of shock).
Once again the forward observer calls down the mortar barrage.
However in this phase the Germans appear to be leading charmed lives and they suffer only one point of shock on each team. The British have thrown all they have at the Germans in this second phase and it's disappointing that more casualties weren't inflicted. I suspect I won't get another chance before they slip away.
As predicted, come the German phase they announce their withdrawal. Dave explained his thinking. Despite the success on the right flank the prospect of then fighting into the village looked like a tall order. More than anything it risked incurring more casualties for potentially little gain. That's a gamble the Germans don't need to take at this stage of the campaign.
We end with British force morale at six and German at four which means I am able to recover a couple of my casualties. That's just as well because losses were fairly heavy considering the shortness of the action. In the end the British suffered nine casualties, all from the core platoon. The Germans suffered eight casualties but the vast majority of these were from the support team, with only two coming from the core platoon.
The victory may have seen the British put a halt to the German counterattack, but it has succeeded in throwing the British right off schedule. The final outcome of the campaign will have implications for the follow on campaign - Scottish Corridor and so the next two games will decide what impact this will have. If the British can win the next two then they achieve a campaign draw, failure to do so will mean the Germans will receive an additional platoon with which to fight the Scottish Corridor campaign so there is still much to fight for.
For the next game we return to St Nicholas Farm. The British managed to force a German withdrawal from there without taking a single casualty, somehow I suspect it will be a little tougher a second time around.